The CST exam rewards people who know the instruments in their hands and the sterile principles behind every move. This guide focuses on high-yield instrumentation and sterile technique topics. You will see why each rule exists, how to recognize instruments fast, and what the National Board loves to test with scenario-style questions.
How to Use This Guide
Learn the “why,” then attach a quick visual or handling cue. The exam often gives you a situation (a contaminated Mayo, a failed Bowie-Dick, a missing sponge) and asks for the next best step. When you know the rationale, the right answer stands out.
Instrument Materials and Care: What Protects Your Set
- Stainless steel types: 300-series (austenitic) for corrosion resistance (e.g., basins); 400-series (martensitic) for hardness and edge (e.g., scissors, rongeurs). This explains why cutting tools hold an edge while basins resist rust.
- Passivation: A protective oxide layer formed during manufacturing or maintenance. It resists rust. Scratches and harsh chemicals break it, which leads to pitting.
- Corrosion and staining: Brown/orange = rust. Dark gray/black = exposure to caustic chemicals. Rainbow sheen = heat damage. Fix the cause (water quality, detergents, autoclave issues).
- Detergents: Use neutral pH and enzymatic cleaners for protein. High pH strips passivation and pits instruments. That shortens instrument life and creates bioburden traps.
- Water quality: Final rinse with deionized or distilled water to prevent mineral spots and pitting. Minerals hold moisture, which fuels corrosion.
- Lubrication (“instrument milk”): Water-soluble, after cleaning and before sterilization. Prevents friction and rust. Never use oil; it blocks sterilant.
- Inspection: Check alignment, burrs, box locks, and ratchets. Ratchets should hold at the first and third notch. Scissors should cut cleanly to the tip. If not, replace or sharpen.
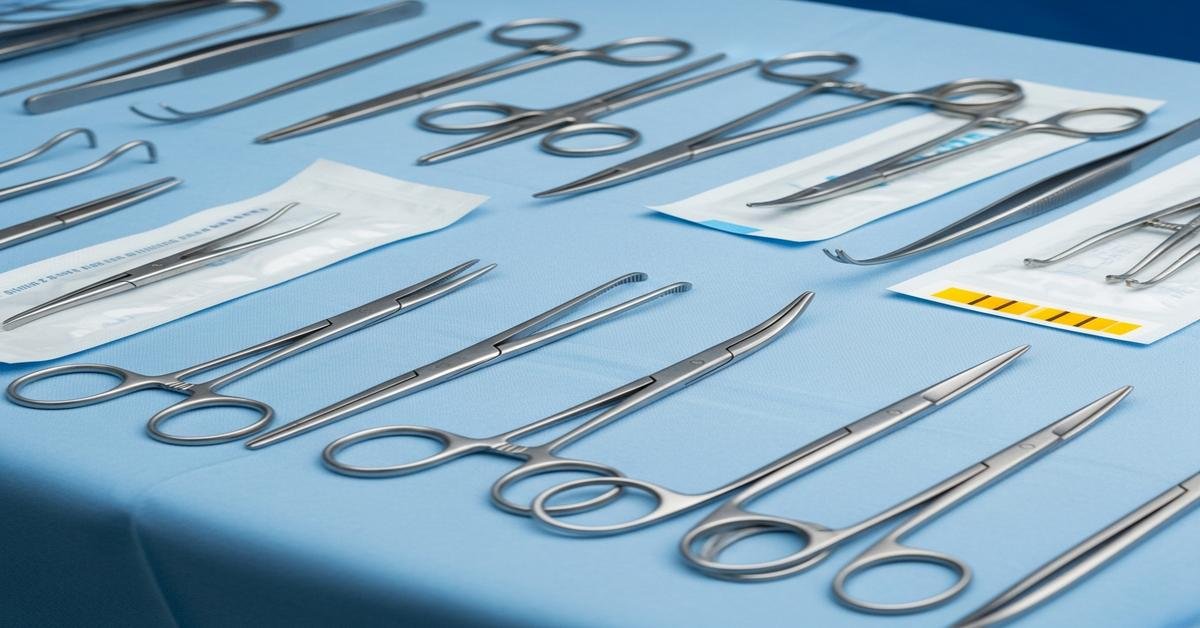
Know Your Categories: The Names, the Uses, the Visual Cues
- Cutting/Dissecting: Scalpels, Metzenbaum, Mayo (straight for suture, curved for tissue), tenotomy, osteotomes, Kerrison rongeurs.
- Grasping/Holding: Adson (teeth for skin), Debakey (atraumatic vascular), Rat tooth (coarse), Babcock (delicate loops), Allis (teeth—use on tissue to be removed), Russian (broad tips for bulky tissue).
- Clamping/Occluding: Mosquito (small vessels), Kelly (half-serrated), Crile (fully serrated), Pean (large), Satinsky/DeBakey (vascular), Bulldog (temporary vessel occlusion).
- Retracting/Exposing: Army-Navy, Senn (handheld); Richardson, Deaver, Harrington (sweetheart); self-retaining like Weitlaner (sharp/dull), Gelpi (sharp), Bookwalter (abdominal), Beckman (laminectomy).
- Probing/Dilating: Probe with grooved director, Hegar dilators, Bakes (biliary), Pratt (cervical), Frazier suction (neuro/ENT) with stylet.
- Suturing/Stapling: Needle holders (Mayo-Hegar, Crile-Wood), skin staplers, linear (GIA), linear stapler without cutter (TA), end-to-end anastomosis (EEA).
- Viewing/Access: Specula, endoscopes (rigid/flexible), trocars, laparoscopic graspers, energy instruments.
Why this matters: The exam will show a photo or describe serrations or tip shape. Visual cues are your fastest route to the correct answer.
High-Yield Detail: Scalpels and Scissors
- Blades: #10 (skin), #11 (stab incisions, drains), #12 (ENT, hook), #15 (short, precise). #20 series for large blades on #4 handle.
- Handles: #3 with 10–15 blades; #4 with 20–25 blades.
- Passing: Handle first, blade facing down and away. Use a neutral zone for sharps.
- Scissors: Metzenbaum (delicate tissue), Mayo curved (dense tissue), Mayo straight (suture). Test with suture or thin gauze—clean cut to the tip.
Clamps, Hemostats, and Forceps: Subtle Differences
- Kelly vs Crile: Kelly serrations go halfway; Crile serrations go full jaw. Full serrations grip small vessels better.
- Rochester-Pean: Large, fully serrated for heavy pedicles. Rochester-Ochsner has teeth—secure on tough tissue.
- Vascular: Debakey forceps (atraumatic) and Bulldog clamps prevent intimal damage. This protects vessel patency.
- Adson: With teeth for skin; without teeth for delicate tissue. Teeth are traumatic—avoid on fragile tissue.
Retractors: Handheld vs Self-Retaining
- Handheld: Army-Navy (double-ended), Senn (one end sharp), Richardson (deep abdominal), Deaver (curved for viscera), Malable (shapeable).
- Self-retaining: Weitlaner (multiple prongs), Gelpi (single sharp prongs), Bookwalter/Thompson (table-mounted). Sharp prongs save hands but can injure skin—pad as needed.
Needles and Holders: Control Is Everything
- Needle holders: Mayo-Hegar (general), Crile-Wood (finer control). Hold at two-thirds from swage for balance.
- Curvature: 1/4, 3/8, 1/2, 5/8. Deeper cavities use greater curvature.
- Points: Cutting (skin), reverse cutting (stronger in tough tissue), taper (soft tissue, bowel, vessels).
- Loading and passing: Place needle perpendicular to holder. Tail 18 inches on the Mayo. Pass with jaws closed to first ratchet to prevent drops.
Staplers and Energy Devices: When, Why, and Safety
- Staplers: GIA (linear cut and staple), TA (linear staple only), EEA (circular anastomosis), skin staplers (skin only). Choose device based on tissue thickness and need to divide.
- Monopolar electrosurgery: Requires patient return electrode. Place over well-perfused muscle, not over bony prominences, scars, hair, or implants. Fluids under the pad cause burns.
- Bipolar: Current flows between tips; no grounding pad. Safer near nerves and vessels.
- Ultrasonic (harmonic): Cuts and coagulates via vibration, low thermal spread. Avoid near flammable gas and do not grasp clips/staples—metal dampens energy.
- Smoke evacuation: Required near plume-producing energy. Plume carries viable cells and toxins.
Endoscopic and Laparoscopic Instruments
- Rigid scopes: Arthroscopes, laparoscopes. Sterilize (steam or low-temp) when compatible. Protect lenses and fibers during cleaning.
- Insufflation: Verify CO₂ tubing and filters. Never use room air—risk of gas embolism and fire.
- Insulation integrity: Test laparoscopic instruments. Cracked insulation causes stray burns. The exam likes this scenario.
- Trocars: Bladed vs bladeless. Always visualize entry when possible to avoid organ injury.
Sponges, Drains, Catheters, and Accessories
- Sponges: Ray-Tec (radiopaque line), laparotomy “laps” (with tape), tonsil sponges (on string), peanuts/Kittners (mount on a clamp), neurosurgical patties (keep moist). Never cut sponges—fiber shedding.
- Drains: Passive (Penrose) vs active (Jackson-Pratt, Hemovac). Active drains reduce fluid pockets; secure properly to prevent dislodgement.
- Catheters: Foley with balloon; Robinson (straight); Pezzer/Malecot (retention). Verify balloon integrity with sterile water, not saline (salt crystals damage valve).
Sterile Technique Fundamentals
- OR zones: Unrestricted (street), semi-restricted (scrubs and caps), restricted (masks with sterile field). This controls airborne contamination.
- Sterile field: Sterile at table level and above, front of gown chest to sterile field, sleeves from 2 inches above elbow to cuff. Back of gown is not sterile.
- One-inch rule: The 1-inch edge of a wrapper is nonsterile. Use transfer forceps or drop technique.
- Movement: Sterile to sterile, unsterile to unsterile. Face the field; do not reach over nonsterile areas.
Scrubbing, Gowning, and Gloving
- Scrub: Timed or counted strokes, nails first, hands to elbows. Hands up; water flows from clean to dirty.
- Drying: Fingers to elbow, one direction; new section of towel per segment. Prevents recontamination.
- Gown and glove: Closed-glove for initial gowning, open-glove for regloving. Change gloves if contaminated; do not touch nonsterile objects.
Setting Up and Maintaining the Field
- Back table and Mayo: Arrange by sequence of use. Heaviest and rarely used items on the back table, essentials on the Mayo. Curved tips toward the same direction for quick grabs.
- Draping: Drop and unfold away from you first. Once placed, do not move drapes; the underside is nonsterile.
- Passing: Palm-to-palm for ringed instruments, tips oriented for immediate use. Say “sharp” on hand-off. Use a neutral zone for sharps transfer.
- Fluids: Pour with lip 1–2 inches above basin. Do not recap or top off sterile basins later.
Sharps Safety and Counts
- Counts: Initial, before cavity closure, skin closure, and at staff relief. Include sponges, sharps, and instruments. Add new items to the count immediately.
- If incorrect: Notify surgeon, stop closure, search systematically, obtain radiograph if unresolved. Document thoroughly.
- Neutral zone: Reduces hand-to-hand passing injuries. Place and retrieve, do not pass midair.
Decontamination and Cleaning Workflow
- Point-of-use: Wipe gross soil, keep instruments moist, separate sharps. Dried soil shields microbes from sterilant.
- Transport: Closed, leak-proof containers labeled biohazard. Protect the team and environment.
- Manual cleaning: Enzymatic soak, brush under water line, flush lumens. Follow IFU for brush size and strokes.
- Ultrasonic: Cavitation reaches hinges and serrations. Do not put power cords or endoscopes not rated for ultrasonic.
- Washer-decontaminator/washer-disinfector: Automated, validated cycles. Properly open box locks and disassemble multi-part items first.
Packaging: Wraps, Pouches, and Containers
- Textile/nonwoven wraps: Use proper fold and secure. Allow adequate drying; moisture wicks microbes.
- Peel pouches: Paper to plastic when sealing. One item per pouch; leave space for steam/air removal. Do not double-pouch unless allowed by IFU.
- Rigid containers: Inspect gaskets, filters, locks, and tamper seals. Test valves and integrity every cycle.
Sterilization Modalities and Parameters
- Steam (gravity displacement): 121°C (250°F) at 15 psi for about 30 minutes for wrapped items. Gravity removes air by displacement—slower but effective.
- Steam (pre-vacuum/dynamic air removal): 132–135°C (270–275°F) for 3–4 minutes for wrapped items. Vacuum pulls air out, so steam penetrates faster. Requires daily Bowie-Dick test.
- Immediate-use steam sterilization (IUSS): 132–135°C for 3–10 minutes depending on device/porosity. Not recommended for implants. If used for an implant, a biological indicator is required and the implant should be quarantined until negative.
- Hydrogen peroxide plasma (low-temp): About 50–55°C. No cellulose or liquids. Good for heat- and moisture-sensitive items. Residue-free, short cycles.
- Ethylene oxide (EO): Low temp gas. Requires controlled humidity and long aeration (often 8–12 hours at 50–60°C). Use for complex lumens and heat-sensitive polymers. Aeration prevents toxic residues.
- Liquid peracetic acid systems: 0.2% at ~50–56°C for immersible devices. Process is point-of-use and immediate; items are not stored sterile.
Monitoring, Indicators, and Load Release
- Chemical indicators: External tape (exposure) and internal strips (penetration). Class 5 integrators and Class 6 emulators give higher assurance inside packs.
- Biological indicators (BI): Geobacillus stearothermophilus for steam and H₂O₂; Bacillus atrophaeus for EO. BI proves sterilization kill.
- Bowie-Dick test: Run daily before pre-vacuum loads. Detects inadequate air removal and vacuum leaks. A failed test means do not use the sterilizer until resolved.
- Load control/traceability: Sterilizer ID, cycle number, date, load contents. Implant loads require BI and should be quarantined until BI is negative.
Flexible Endoscope Reprocessing (High-Yield Steps)
- Bedside: Wipe and flush immediately. Prevents biofilm.
- Leak test: Before immersion. A leak draws fluid inside and ruins the scope.
- Manual cleaning: Brush all channels to visible soil-free.
- High-level disinfection (HLD): Glutaraldehyde or OPA per IFU (e.g., glutaraldehyde 2% often 20+ minutes; OPA ~12 minutes at 20°C). Use test strips to verify minimum effective concentration.
- Rinse, alcohol flush, forced-air dry: Water removal prevents microbial growth. Store hanging, valves removed, in a ventilated cabinet.
- Note: Flexible GI scopes are semi-critical and typically HLD; rigid arthroscopes and laparoscopes are sterilized.
Common Situational Questions and Best Answers
- Count off by one lap sponge: Stop closure, notify surgeon, search, check trash/linen, look under drapes and in cavities, obtain intraoperative radiograph if not found, document.
- Bowie-Dick fails: Do not run pre-vac cycles. Investigate and correct. Document and re-test before releasing the sterilizer.
- Return electrode cannot adhere: Clip hair, dry site, choose a new muscular location. Never place over bony prominences or implants.
- Laparoscopic burn with intact pad: Suspect insulation failure or capacitive coupling. Remove and test instruments, minimize energy near metal trocars, use lowest effective power.
- Wet packs after steam cycle: Quarantine. Wet wicks microbes. Reprocess after fixing drying time, load density, or packaging.
- Frozen section specimen: Send fresh, never in formalin. Label with patient identifiers and source.
- Tourniquet questions: Typical limits: about 60 minutes upper extremity, 90 minutes lower; pressures roughly 50–100 mmHg above systolic (upper) and 100–150 mmHg above (lower). Always verify limb padding and document time on/off.
Exam-Favorite Instrument Pearls
- Allis vs Babcock: Allis has teeth—use on tissue to be removed. Babcock is atraumatic—use on bowel, tubes.
- Debakey: Atraumatic vascular forceps. If the question mentions “intima protection,” choose Debakey.
- Gelpi vs Weitlaner: Both are self-retaining. Gelpi has single sharp points; Weitlaner has multiple prongs. Sharp points risk skin tears—pad them.
- Kerrison rongeur: Remove bone in spine. Clean the footplate thoroughly; residual bone causes jamming and sterilization failures.
- Frazier suction: ENT/neuro with a stylet. The stylet clears clots to maintain suction.
Safety Around Power and Pneumatic Instruments
- Never run a power handpiece without an attachment: Damages the motor.
- Use instrument air or nitrogen, not oxygen: Oxygen feeds fires.
- Cover with sterile drapes: Prevent fluid infiltration. Check seals and hoses for leaks.
Creating a Reliable Routine (What Examiners Expect)
- Before the case: Verify set integrity, check indicators, open aseptically, organize the field by sequence, test ESU and smoke evacuation, flush lumens.
- During the case: Anticipate, protect tissue (atraumatic handling), track sharps, keep field tidy, add items to the count immediately.
- After the case: Separate delicate and heavy tools, keep moist, send in covered containers, communicate special cleaning needs (e.g., loaners, lumened items).
Quick Recall List (Last-Minute Review)
- Steam pre-vac: 132–135°C, 3–4 min, daily Bowie-Dick.
- BI organisms: Geobacillus stearothermophilus (steam, H₂O₂), Bacillus atrophaeus (EO).
- Monopolar pad placement: Clean, dry, muscular area; avoid scars, implants, bony prominences.
- Insulation testing: Laparoscopic instruments to prevent stray burns.
- Scissor rules: Metzenbaum for tissue; Mayo straight for suture; curved for dense tissue.
- Allis vs Babcock: Teeth mean traumatic (Allis); smooth means atraumatic (Babcock).
- IUSS implants: Avoid. If unavoidable, use BI and quarantine until negative.
- Counts: Initial, cavity, skin; resolve discrepancies before closure or get an X-ray.
- Flexible scope steps: Bedside preclean, leak test, manual clean, HLD, rinse, alcohol, dry, hang.
- Sponges: Never cut; mount peanuts; keep patties moist; unfolded Ray-Tecs in abdomen.
Master the instrument cues and sterile principles, and the CST exam scenarios become straightforward. Focus on why each step exists: it protects the patient, the team, and the outcome. That logic will guide you to the best answer, even when the question is tricky.

I am a Registered Pharmacist under the Pharmacy Act, 1948, and the founder of PharmacyFreak.com. I hold a Bachelor of Pharmacy degree from Rungta College of Pharmaceutical Science and Research. With a strong academic foundation and practical knowledge, I am committed to providing accurate, easy-to-understand content to support pharmacy students and professionals. My aim is to make complex pharmaceutical concepts accessible and useful for real-world application.
Mail- Sachin@pharmacyfreak.com