High-risk sterile compounding leaves no room for guesswork. The Board Certified Sterile Compounding Pharmacist (BCSCP) exam expects you to think like a quality lead: protect first air, validate every critical step, and justify beyond-use dates with science. This guide focuses on the two pillars that decide pass or fail—aseptic technique and quality assurance—and shows how to apply them to high-risk preparations, including those requiring sterilization, extended BUDs, or complex manipulations.
What “high-risk” means under BCSCP and USP
Older USP language grouped compounding into low-, medium-, and high-risk. The 2022 revision of USP <797> now uses Category 1, 2, and 3 CSPs. Exam questions may use either set of terms. Treat “high-risk” as preparations with greater contamination risk or higher stakes if contamination occurs—for example, using nonsterile ingredients that must be sterilized, performing complex manipulations, making large batches, extending BUDs beyond defaults, or compounding for routes like intrathecal.
Why this matters: high-risk work requires stronger controls. You must demonstrate validated aseptic technique, strict environmental control, robust sterility assurance (filtration or terminal sterilization), and supporting tests (sterility, endotoxin, and often container-closure integrity) if you want longer BUDs. On the exam, when in doubt, choose the option with better sterility assurance and documented evidence.
Core aseptic principles you must master
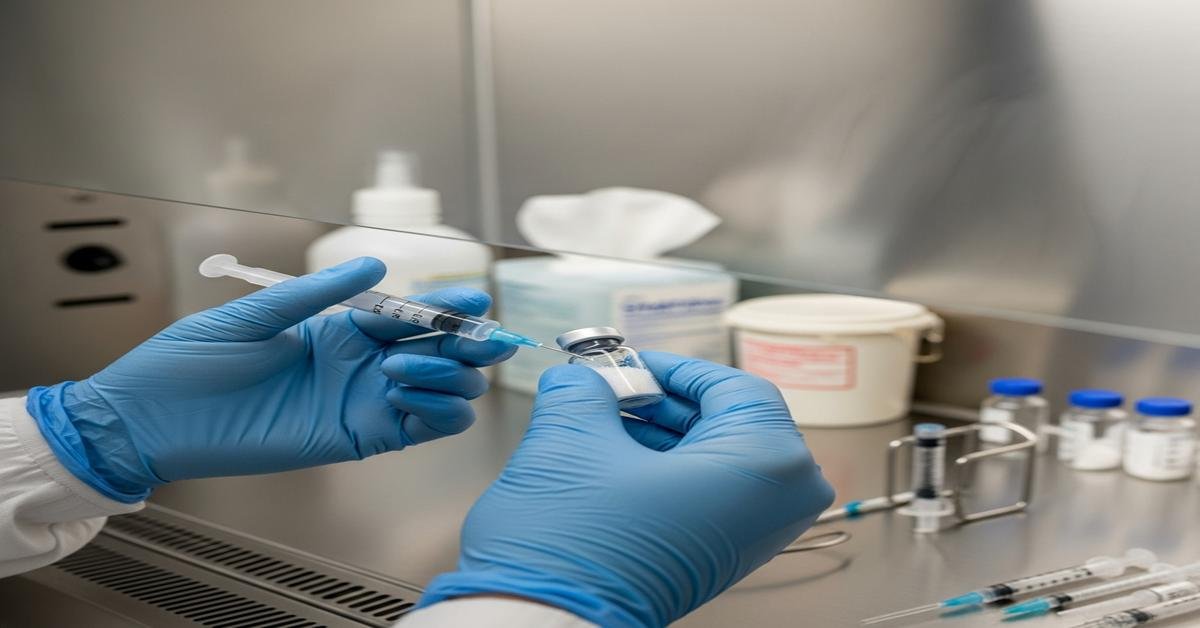
Protect first air. First air is the clean, unidirectional HEPA-filtered air that exits the PEC. Keep it unobstructed. Never put hands or supplies between the HEPA filter and critical sites (needle hubs, vial stoppers, ampule necks, and the septum of infusion bags). Why: microbes ride on particles. Anything that blocks first air allows particles to settle on sterile surfaces.
Understand unidirectional flow and layout. Work at least 6 inches inside the hood to reduce backflow. Place the most critical manipulations closest to the HEPA filter. Stage supplies so downstream items do not create turbulence over critical sites. Why: misplacement causes reverse currents and particle shedding into your sterile field.
Hand hygiene and garbing in the right order. Don shoe covers, head/facial hair cover, and face mask first. Wash hands and forearms with warm water and antimicrobial soap (at least 30 seconds). Dry with low-lint towels. Don gown. Enter the buffer area. Apply alcohol-based hand rub. Don sterile gloves. Disinfect gloves with sterile 70% IPA and let them dry. Why: this order moves from dirtiest to cleanest and prevents recontaminating what you just cleaned.
Know your PECs.
- LAFW/CAI for nonhazardous CSPs in positive pressure environments.
- BSC/CACI for hazardous drugs under negative pressure and external exhaust.
- PECs provide ISO Class 5 air; they must sit in an ISO Class 7 buffer room (or meet the requirements of a Category 1 segregated area for short BUDs).
Why: matching the PEC to the drug hazard and room pressure keeps operators safe and products sterile.
Disinfect like you mean it. Use sterile 70% IPA on gloves, vial stoppers, ampule necks, and work surfaces. Wipe in one direction from clean to dirty. Allow a wet contact time (at least ~30 seconds) and air-dry; do not wipe dry. Why: alcohol needs contact time to denature proteins and kill organisms. Wiping too soon leaves live microbes.
Basic sterile manipulations done right.
- Scrub vial stoppers with sterile alcohol using friction; let dry before piercing. Wet rubber pushes contaminants into the vial.
- Position needles and syringe tips so first air hits the hub and bevel. Avoid shadowing with hands or supplies.
- Open ampules with a sterile gauze. Immediately filter with a 5-micron filter needle or straw to remove glass, then refilter through 0.22 micron if sterilization by filtration is your method. Why: glass shards are not acceptable particulates.
- For intermittent use within a batch, cap needles and protect luer tips with sterile covers. Why: open connectors are contamination magnets.
Common failure modes. Reaching over open containers, rotating supplies in front of the HEPA filter, skipping the dry time after alcohol, or parking high-shedding packaging in the hood. Why: each increases droplet and particle fallout onto critical sites.
Competency and process validation
Gloved fingertip and thumb sampling (GFTS). Initially, you need three consecutive successful post-garb GFTS with zero CFUs before compounding independently. Ongoing GFTS is typically performed at least every six months, or sooner if there is a failure or a long absence. Why: your hands are the number one source of contamination; this test is the most direct check.
Media-fill tests. Perform initially and at least every six months. Use a process-simulating transfer workflow representative of your risk level (e.g., multiple entries for batch work). Incubate at two temperatures for a total of 14 days. Any turbidity is a fail. Why: it proves your technique and your process can keep contaminants out.
Technique observation. A qualified observer should verify critical manipulations, product and personnel flow, and cleaning steps initially and every six months. Why: you miss your own blind spots; an observer finds risky habits.
Action on failures. Stop independent compounding, retrain, repeat testing, and document corrective actions. Why: compounding without demonstrated competency risks patient harm and fails the standard of care.
Environmental and facility controls
ISO classifications to know. The PEC (hood or isolator) must be ISO 5. The buffer room is typically ISO 7. The ante-room is ISO 7 or 8 depending on adjacent areas and pressure scheme. Why: lower ISO numbers mean fewer particles and lower microbial load, which lowers contamination risk.
Pressure differentials. Maintain a positive pressure of at least 0.02 inch water column from buffer to ante for nonhazardous compounding. For hazardous compounding, keep the hazardous buffer negative to adjacent spaces. Monitor continuously if possible, document at least daily. Why: airflow direction prevents dirty air from entering clean spaces.
Certification and monitoring.
- PEC and room certification at least every six months, and after moves, repairs, or changes. Nonviable particle counts verify ISO classification.
- Viable air sampling at least every six months; surface sampling at least monthly. Investigate and correct any action-level excursions.
- Temperature, humidity, and pressure recorded daily (or continuously). Why: microbes grow faster in warm, humid environments; unverified conditions invalidate your controls.
Cleaning frequency (typical minimums).
- PEC: at the start of each shift, before each batch, every 30 minutes during compounding, after spills, and when contamination is suspected.
- Work surfaces and floors: daily.
- Walls, ceilings, storage shelving: monthly.
Use appropriate agents in order: remove residues with a cleaner, then disinfect with sterile 70% IPA; use sporicidal agents at required intervals. Why: cleaning removes soils; disinfectants act on microbes; spores need sporicidal chemistry.
Sterilization and depyrogenation
Terminal sterilization (preferred when possible). Moist heat (autoclave) is the gold standard for heat-stable, water-based products. Typical cycles reach 121 °C under pressure. Validate by demonstrating that the slowest-heating point achieves the necessary lethality. Why: terminal sterilization treats the filled, sealed product, providing higher sterility assurance than aseptic filtration alone.
Sterilizing filtration (0.22 micron). Use for heat-sensitive solutions prepared from sterile or appropriately treated components. Filter into sterile, depyrogenated containers under ISO 5 conditions. Perform filter integrity testing (bubble point) after filtration to confirm performance. Why: integrity testing is your proof that the filter did its job.
Dry heat depyrogenation. Use 250 °C (or validated alternative) for adequate time to reduce endotoxins on glassware and metal. Do not rely on alcohol for pyrogens; it does not remove or inactivate endotoxin. Why: endotoxins are heat-stable lipopolysaccharides; only high dry heat or validated processes reduce them effectively.
What not to do. Do not autoclave oil-in-water emulsions without data; do not attempt to “sterilize” by UV in the hood; do not assume a 0.22 micron filter removes endotoxin. Why: these either do not work or damage the product.
Endotoxin control and testing
Why endotoxin matters. Even sterile products can cause fever, shock, or neurologic injury if endotoxin levels are high. High-risk routes like intrathecal demand extremely low limits.
LAL testing. Use bacterial endotoxins testing (e.g., LAL methods) when required, especially for Category 3 CSPs or when extending BUDs. Calculate the maximum allowable endotoxin load based on dose and route. As a rule of thumb, the systemic limit is often cited as 5 EU/kg/hour for IV exposure, with a much stricter intrathecal limit (commonly treated as 0.2 EU/kg). Always apply product- and route-specific calculations. Why: patient dose determines how much endotoxin the body can safely tolerate.
Practical controls. Use water for injection, depyrogenate glassware, avoid touch contamination at closures, and do not reprocess to “fix” endotoxin failures. Why: prevention is the only reliable strategy.
Sterility testing and BUD decisions
When sterility testing is required. If you extend BUDs beyond defaults—particularly for Category 3 CSPs—you must support sterility with validated tests. USP sterility tests typically incubate samples for 14 days across two temperatures/media. Why: slow-growing organisms need time and the right conditions to reveal themselves.
Choosing a method. Membrane filtration is preferred for clear, filterable solutions; direct inoculation is used when filtration is not feasible. Sample volumes must meet USP requirements. Why: inadequate sample volumes or the wrong method can miss contamination.
Default BUDs to remember (without additional testing).
- Category 1 (segregated compounding area): up to 12 hours at room temperature or 24 hours refrigerated.
- Category 2, aseptic from sterile components in a cleanroom: up to 4 days at room temperature, 10 days refrigerated, or 45 days frozen.
- Category 2, terminally sterilized: may allow longer default BUDs than aseptic processing, if the product and cycle are suitable.
Note: Older “high-risk” default BUDs were very short (e.g., 24 hours at room temperature, 3 days refrigerated) when using nonsterile ingredients without further evidence. If you see those in a question, map them to the scenario presented.
Category 3 and extended BUDs. To go beyond Category 2 defaults, you need data: sterility testing, endotoxin testing (as applicable), container-closure integrity, and stability studies. Why: time increases risk. Only evidence can justify longer storage.
Quality assurance system: what examiners expect
Quality is a system, not a checklist. A passing answer ties technique to documentation, monitoring, and corrective action. Build your mental model around these pieces:
- SOPs that match what actually happens in the cleanroom.
- Master formulation records (MFRs) with all steps, in-process checks, sterilization parameters, and acceptance criteria.
- Batch records capturing who did what, when, with which lot numbers, weights/volumes, yields, and deviations.
- Labeling and release steps including independent verification and quarantine until QC checks pass.
- Environmental monitoring program with defined action levels, investigations, and CAPA.
- Supplier qualification and incoming verification of components with COAs.
- Equipment calibration, maintenance, and cleaning logs.
- Change control for anything that affects the process or environment.
- Deviation management with root-cause analysis and effectiveness checks on CAPA.
Why: sterile compounding safety comes from reproducible processes. If it is not documented, it did not happen.
Hazardous high-risk compounding: extra controls
Engineering controls. Use a negative-pressure room for hazardous drugs with a BSC or CACI that vents externally. Keep appropriate pressure cascades to protect adjacent areas. Why: this protects staff and prevents drug contamination of clean areas.
PPE and technique. Use chemotherapy gowns, double ASTM-tested gloves, and eye/face protection as needed. Favor closed-system transfer devices when compatible, but do not replace proper technique. Why: hazardous drugs are toxic at low doses; multiple barriers reduce exposure.
Decontamination and waste. Follow a defined sequence: deactivation, decontamination, cleaning, disinfection. Dispose of waste in proper containers. Why: disinfectants do not neutralize hazardous residues; you must remove and inactivate them first.
Calculations and compatibility you must handle
Osmolarity and pH. Parenterals must be isotonic or close to it unless route-specific factors allow otherwise. Calculate osmolarity of TPNs or hypertonic solutions and dilute as needed. Why: extremes cause phlebitis or hemolysis.
Filter binding and particle control. Protein drugs may bind filters; choose low-protein-binding membranes when needed. Use 0.22 micron filters for sterilizing filtration and 1.2 micron for large lipid emulsions (to remove Candida-size contaminants while preserving emulsion). Why: the wrong filter ruins the product or the patient’s safety.
Calcium-phosphate in TPNs. Keep calcium and phosphate within solubility limits: add phosphate first, mix, then add other components, calcium last; keep lower pH and use calcium gluconate, not chloride. Use the most dilute concentration feasible and consider temperature. Why: precipitation risks emboli and death.
Container interactions. Some drugs adsorb to PVC or are light-sensitive. Choose compatible containers (e.g., glass, polyolefin) and protective covers. Why: loss of potency or harmful leachables can be silent failures.
Practice scenarios
Scenario 1: Nonsterile bulk powder to injection. You must dissolve the API, sterile filter through a 0.22 micron validated filter into sterile, depyrogenated vials, or terminally sterilize if feasible. Confirm filter integrity. If extending BUDs, perform sterility testing, endotoxin testing, and container-closure integrity. Assign BUDs based on data, not habit. Why: starting with nonsterile powder elevates risk; only robust controls make the product safe.
Scenario 2: Batch cefazolin syringes from sterile vials in cleanroom. Aseptically prepare under ISO 5 in an ISO 7 buffer room. Without extra testing, Category 2 default BUDs apply (e.g., 4 days room temp, 10 days refrigerated). If the service line wants 30 days, you need Category 3 controls with supporting tests and stability data. Why: demand does not justify risk; evidence does.
Scenario 3: Intrathecal morphine syringes. Avoid preservatives. Filter sterilize if terminal sterilization is not suitable. Use strict aseptic technique and minimize BUD. Confirm endotoxin control; intrathecal limits are much lower. Why: neurotoxicity risks demand ultra-low bioburden and endotoxin.
Scenario 4: Lipid-containing admixture. Do not sterilize by 0.22 micron; use 1.2 micron filters for administration. Keep emulsion stability in mind and avoid heat. Assign BUDs conservatively unless you have supporting data. Why: emulsion droplet size and stability are safety-critical.
Study plan: how to learn and retain
Week 1: Foundation. Build flashcards for must-know numbers: ISO classes, default BUDs, pressure differential, GFTS/media-fill frequencies, filter sizes, and cleaning schedules. Walk through garbing and aseptic steps out loud until you can teach them.
Week 2: QA systems and tests. Outline an end-to-end quality system for a sample product. Draft an MFR and batch record. Practice writing an investigation for a surface sampling failure with a CAPA plan. Learn sterility and endotoxin test logic and sample sizes.
Week 3: Risk-based decisions. Work through 20–30 scenarios. For each, answer: Can I terminally sterilize? If not, how do I validate filtration? What BUD is justified with and without data? What monitoring and documentation prove control?
Week 4: Timed mixed sets. Simulate exam conditions. After each set, list what you guessed and why. Close gaps using targeted reading of USP concepts and your notes. Re-teach a tough topic to a colleague. Teaching exposes weak spots.
Exam strategy shortcuts
- Pick terminal sterilization over aseptic filtration when feasible and safe for the formulation.
- When two answers seem close, choose the one that better protects first air or has stronger documentation.
- Never extend a BUD past default without data (sterility/endotoxin/CCI/stability).
- On environmental excursions, quarantine affected batches, investigate, and implement CAPA; do not “recertify later” while compounding continues.
- For hazardous compounding, negative pressure and external venting are non-negotiable.
Quick reference numbers to memorize
- PEC ISO class: ISO 5. Buffer room: typically ISO 7. Ante: ISO 7 or 8 per design.
- Pressure differential: at least +0.02 inch w.c. from buffer to ante for nonhazardous; negative for hazardous rooms.
- GFTS: 3 consecutive initial passes with zero CFUs; then at least every 6 months.
- Media-fill: initially and at least every 6 months; incubate for 14 days across two temperatures.
- Environmental sampling: viable air at least every 6 months; surfaces at least monthly; certification at least every 6 months.
- Cleaning (PEC): start of shift, before each batch, every 30 minutes during compounding, after spills, and when contamination is suspected.
- Disinfectant contact time: allow sterile 70% IPA to remain wet and air-dry (about 30 seconds or per label).
- Filters: sterilizing 0.22 micron; administration of lipids 1.2 micron; verify filter integrity (bubble point).
- Default BUDs: Category 1: 12 h room temp / 24 h refrigerated. Category 2 (aseptic, sterile components): 4 d room temp / 10 d refrigerated / 45 d frozen. Terminal sterilization may allow longer defaults. Extended BUDs require data.
- Endotoxin limits (rules of thumb): IV 5 EU/kg/hour; intrathecal much stricter (commonly treated as 0.2 EU/kg). Always calculate per product and route.
- 6-inch rule: perform work at least 6 inches inside the PEC.
Final takeaways
High-risk sterile compounding is about layers of protection. Technique protects the product in the moment. The facility reduces background risk. The quality system proves that protection holds day after day. For the BCSCP exam, show that you can connect all three. Choose terminal sterilization when you can. Validate filtration when you cannot. Assign BUDs you can defend. And above all, protect first air, every time.